Friday, March 21, 2014

Basic meat stock

Most people know how to make soup stock, but often home made soup stock ends up tasting bland... Am I right? I found this perfect recipe for soup stock and made it more do-able and timely for myself! I hope you will enjoy my method!

Three major differences in my method:
1) roasting bones and veggies before you start
2) mixed bone broth
3) salt

First you need to pick your bones. I have done this with left over turkey carcasses or chicken too. But the best stock has a mixture of foul and cattle bones. It gives your stock a nice rounded flavour. So go to your supermarket and find some bones!

I bought whatever is cheapest. Two turkey thighs, 5 chicken legs and a pkg of frozen beef soup bones (thawed). 

First thing is first! If you are thrifty like me, cut the meat off your birds and cook it up for later use. 

Clearly I am not a professional butcher. Even if you will be using this meat for your soup later on it doesn't need to come off looking pretty. But reserving your meat and cooking it separately from your stock will allow the meat to retain some of it's flavour so it stands out in your finished soup. I was not very clean with my cutting so there is still plenty of meat attached to the bones for flavouring the stock. 

Keep all the fat and skin too because it adds flavour. You can cool and remove 100% of the fat at the very end. 

Next comes roasting! So spread your bones out evenly, leaving lots of space for veggies on the pans. I used three glass pans so everything will get evenly roasted and I can scrape off drippings without wrecking a pan. 

Choose your veggies. I always use plenty of onion and cellary and I am a little less generous with carrots since they tend to over-power with a sweeter flavour in the broth. Soup stock is excellent with A roasted tomato or two. It really helps to deepen the color and does not at all turn it into a tomato broth. For this batch I didn't have any handy. Garlic is more of a spice, but since it gets roasted I included it here. 

Cut all veggies into large pieces and separate into your casseroles. 
Another thing that adds flavour is the onion and garlic skins as well as the cellary leaves. These would burn during roasting so just stick them right into your stock pot. 
Now roast your veggies at 425 degrees for 45 minutes, rotating and stirring everything every 15 minutes. 
Once you add it all to your stock pot, cover the bones and veggies with water. Do not completely fill your stock pot yet, because you will add water in a little bit. 

This is called letting the stock rest. You just let things soak for 15 minutes or so. You can add a tbsp or two of vinegar to this to help draw juices out of bone marrow. I forgot to with this batch. 
Now you are left with this... But actually this is good!! Cover the crusty areas if your pans with water, and pop them back into the oven for 15 minutes to soak. Leave the heat on for this. 

Pull them out, scrape them and put it all into your stock pot!! There is excellent flavour in those pan crusties!
See how dark the stock is already? It hadn't even been on the stove top yet! 

Now top up your stock pot to its max capacity and bring it to a boil. Simmer for 8-12 hours (all day)
I love my giant Costco stock pot... :)

When you are ready for making super, use a strainer to label out the amount of broth you need, then top up your stock pot and let it continue simmering into the evening. I only strain my stock right before bed. 

Make your soup...I use some meat reserved from earlier, and a bunch of carrots, cellary and onions. Simmer it all for 20-30 minutes, boil up some noodles, rice or barley, and add that to your finished soup!
Tada!!

To strain, use a big bowl or another stock pot, place the strainer over it and laidle stock into clean pots. Once strained, you can rinse out your big stock pot and put the clean broth in there for fridge storage. 

If you have a pressure canner, you can can this stock. Otherwise I like to freeze it in 1 cup portions in zip-lock baggies. 

Basic meat stock (this particular batches proportions. This is not a science, change the proportions however you desire)

- 2.5-3 kg mixed meat/bones (this was before removing meat from foul)
- 3 med onions
- 6 lg cellary stocks
-4 lg carrots
-6 lg garlic cloves
-6-8 bay leaves
- 1 tbsp peppercorns 
- 1 tbsp sea salt
- 1 1/2 star anise

Remove any large amounts of meat and cook for later use. Cut veggies and garlic into large chunks and roast with bones at 425 degrees, for 45 min, stirring every 15 minutes. Put everything into stock pot. Soak pans and scrape drippings into stock pot as well. Add enough water to make 14 quarts. Bring to a boil and simmer all day. Strain and can or freeze stock. 

Wednesday, March 5, 2014

Blessing Bags

This post is a little different. Its not a recipe. It's kinda food related but mostly about spiritually feeding ourselves and "the least of these"   I think this is important to my topic of "eating to live tomorrow". It's all about big picture ideas. And the biggest picture of all, is eternity. And the truth is, if I can afford to eat this healthy (what a blessing) I can afford to bless someone less fortunate as well. 

Blessing bags are bags that you fill with life essentials to hand out to the homeless instead of giving them change. Personally I am always Leary of handing out cash, cause I don't want it to be drug money... And  I also almost never have cash. Sometimes I take a homeless person out to eat, but that can also get expensive (and isn't exactly safe or timely). Blessing bags are the perfect solution. Keep one or two in each vehicle to have on hand! 

I was really debating if I should share this. We have been reading through the New Testament as a church for 3.5 weeks now, and will complete it in 66 days total.  I have really had my eyes opened as I study the character of Christ. And I am haunted by his beatitudes and woe's. It really doesn't read like any of us North American Christians will make it into the kingdom of heaven... If you just give the gospels an un-biased read... Anyway the part of this all that has stuck with me is looking for the "least of these" around me. This is just one way I can see myself doing this. Not the only way, but a small way.  The reason I wasn't going to share this, is I don't want to do it for earthly praise. I want to store up treasure in heaven! But when I see Jesus teachings, another common occurrence is the notion that we ought to use our brains and logic not just legalize his teachings. The greater good in my opinion would be for you to read this post, and decide to make blessing bags of your own!! If it can encourage a parent to teach this to the next generation, all the better!

Some of you may be creative and you can simply take the idea and run with it. Others of you may be less creative and would like a bit of structure and "how-to". 

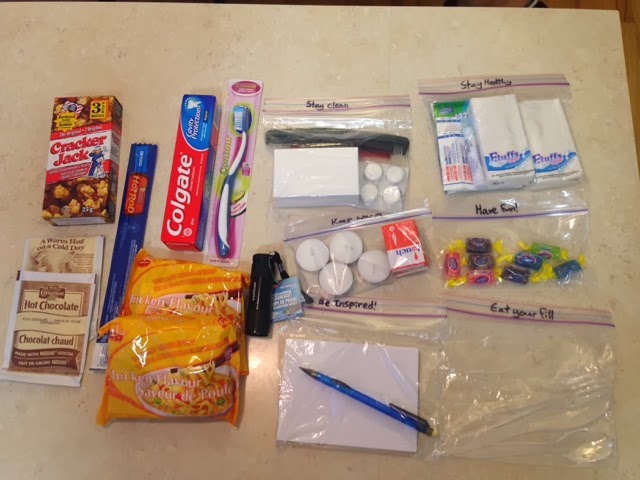
I built my blessing bags entirely from one shop at dollarama. I made four blessing bags for a little over $50.00. That's roughly $12-13 a bag. Not bad for a mini survival kit! (And still cheaper than taking them out to eat)

Supplies you will need at home: 
- 4 XL freezer bags. (Large rectangular, not square)
- scissors to cut off packaging
- permanent marker
- zipper sandwich bags and snack bags

Shopping in multiples:
If you have ever made a Christmas shoe box, think of this like that... If you make one, it's not cheap. If you make two or more it actually gets cheaper per shoe box because you can often buy things in multiples! I started with my dollarama XL zipper bags, a box of six, and quickly decided my cheapest number to work with would be four. Most items I needed came in packs of two or four. In order to make six bags, this would leave a lot of product wasted. So look around your dollar store and see. Do things come more in packs of two? Three? Four? Don't walk in with your pre-chosen number to make. Let the store decide. 

Categorize:
Decide what needs you want to meet. Food, clothing, shelter, warmth, health, happiness, spiritual blessing etc...
I chose:
- heigine (cleanliness)
- health (minimal first aid)
- warmth 
- food
- inspiration
- fun

Don't make an itemized list of what you will put in the bag, then you will be shopping at multiple stores to complete your list and spend more than you planned to. Buy what you see that fits your categories and forget the rest. This is a gift. You are not their sole provider. 

For health:
Some Sani-wipes (24 pk), band aids (1 box divided 4 ways), lip chap (2/$1.25), and Kleenex(8/$1). 

For Heigine:
A bar of goats milk soap (2/$1), combs (pkg of 8 for a $1), magic towels (8/$1), tooth brush (2/$1), and toothpaste ($1).

I did not include shampoo or deodorant because it didn't fit into my budget for the sizes they had available. Plus I want it to be winter friendly. Surprisingly it takes a lot to freeze toothpaste. Frozen shampoo is somewhat useless to anyone. 

Just for fun:
1 pkg jolly ranchers divided. (I chose a hard candy because it has to withstand -40 and +40 degrees in a car)

Warmth:
This one is controversial to a lot of folks. My theory: everyone and their dog has a lighter these days. If they want to be destructive with fire, it is hardly my fault. Sometimes at minus 40 they still don't land a bed in a shelter.  I'd rather provide them some heat and light that they can maybe use in several ways. I chose matches over a lighter because i have no idea how lighter fluid holds up to freezing and boiling temperatures, and I just don't feel comfortable having it laying around in my car. Plus it could leak. 

For food:
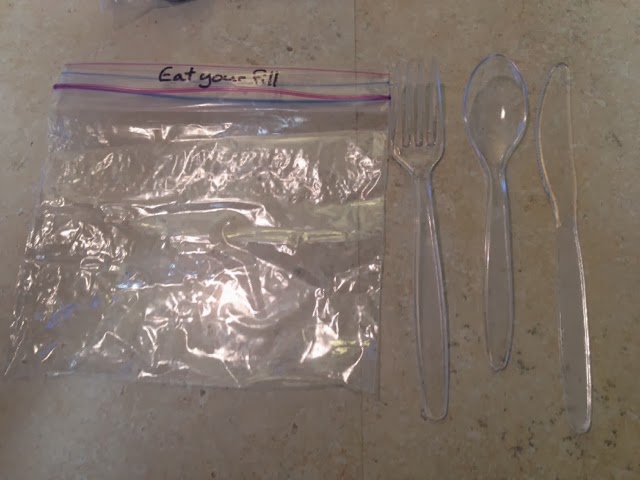
Cutlery is important! Don't sweat it with the knife. If someone wants to make a weapon they will make it out of anything. May as well give this person the dignity of proper utensils. 

You need to use your noggin a bit here. Healthy doesn't always cut it, especially for food that can withstand plus and minus forty degrees!! Light weight, filling and convenient is the key. Can they open and eat it? (Cans are no good, unless you give them a can opener) Or make it with just adding hot water(mc Donald's or subway would give them this free of charge)? 
I do cringe because I wouldn't feed this to my child... But if I was homeless and hadn't eaten all day, I wouldn't hesitate. Here is a very filling meal for a person. The noodles (2/$1) are light weight and easily made with hot water or eaten straight as they are. Hot rod (2/$1) does provide some protein believe it or not... Cracker jacks (3/$1) will have sugar which is actually okay for many diabetics on our streets, as well as fiber and carbs. And hot chocolate (10/$1) is always a nice treat for anyone. 

Inspiration:
Everyone needs to write things down. And I chose a blank pad as opposed to a lined one incase they also like to be artistic. Paper (4/$1) and mechanical pencils (4/$1) are great and don't explode or freeze.  

Essential:

I decided a  LED flash light ($2 ea) was essential since it gets dark so quickly here.  You may have other essentials on your list. Lots of people like to include a calling card or Tim Hortons gift card. My budget doesn't allow for this, but I am happy with my bags. 


How to pack your bags:
- open up un-necessary packaging, and divide your purchases into four equal heaps

- sub-divide each pile into categories. 

-bag items that would need to be kept clean or contained, and label them as desired. 

- put all items into your XL zipper bag. 
-write a blessing on the bag label or in a card. Keep it simple. The person may or may not have a good reading level.  My bags say: "BLESSING BAG!  May God give you the strength and hope you need for the journey ahead". 

And that is it! I hope you found this helpful and will pay-it-forward! 


Saturday, February 8, 2014

Healthy baked oatmeal

So I just made this one up.... Out of nowhere. I wanted a treat for night snack and this is what happened! Even Curtis liked it. (With ice cream... But still!!)

Healthy baked oatmeal:

- 1 1/3 cup quick oats
- 1/4 cup sugar of choice (I used palm sugar, but honey or brown sugar would be okay too)
- 2 tsp baking powder
- 1 tsp cinnamon
- 1/4 tsp allspice
- 1 pinch salt
- 3 eggs (free run)
- 1 mashed banana
- 1 tbsp vanilla (I use homemade)
- 1 tsp maple extract (almond, rum or coconut extract would also taste good!)
- 1/2 an apple chopped very small
- 1/2 generous cup blueberries
- 1/2 cup non-dairy milk (I used coconut)

Mix your dry ingredients and add wet ingredients right to the bowl of dry. Lastly add your fruit. Stir it up and pour into an 8 or 9 Inch square pan. 

Bake at 375 for 30 minutes or until the top is dry ish and springs back when lightly pressed. 

I make this into four servings for a full serving of oats, fruit and only 2 ish tsp of sugar!! (Good with some maple syrup tho...:) I would also add some chopped nuts to the batter next time!


Monday, February 3, 2014

Plantain deceptions!!

These recipes are both adapted minimally from "the paleo mom" seriously... Check her out. Amazing blog!

Two recipes today involving my new discovery: plantains. Pancakes and crackers!

Plantain is More like a potato than a banana really (in how you use it), and classified as a vegetable actually, but a member of the banana family all the same.  http://www.thepaleomom.com/2012/09/perfect-paleo-pancakes.html

This link takes you to the original pancake recipe, but if you scroll down, she has an excellent little video about how to use plantains! If you have never worked with them, check it out!

First, plantain crackers! Only three ingredients: plantains, coconut oil and salt... (I added some sesame seeds)
Melt your coconut oil, chop up your plantains and add in your salt. Purée this mix until it is perfectly smooth
Like this... It's super thick. 
Like... "Thicker than DQ" thick. 


Dump this out onto a large (like 13" is the short end) parchment lined baking sheet. 
You can try to spread it with the back of a spoon, but this is as far as I got. 
I just cut a second piece of parchment and used something with a flat edge (no idea what this is!) to scrape it out nice and thin. Be careful not to accidentally scrape it so thin you can see your pan underneath. But you do want it quite thin. This step takes a little while. 
Next I sprinkled mine with sesame seeds (feel free to, or not, or use something else like flax, chia or poppyseed, etc...) and pop it in the oven for the first measure of time. 
The original recipe calls to score the tray into cracker pieces, but I found it looked like this in the end on the places I didn't cut all the way through. 
So if you want pretty uniform crackers you will want to make sure you cut all the way through. a pizza wheel works best for this.  After your second baking time you are done! The time is a bit flexible. If your plantains are bigger the mix will be thicker and your bake time longer. If they are smaller, your bake time will be shorter. The easiest way to do this is to just eat one after 60 minutes. Then add 10-20 minutes depending on how crispy they are. 
I let mine cool on paper towels before baggig them up. They will keep on your counter for a week, but I store them in my freezer so I don't feel rushed to eat them all. 
Plantain crackers:
2 lg green plantains
1/2 cup coconut oil 
1 tsp salt
Sesame seeds

Peel and slice plantain. Purée well with coconut oil and salt. Spread evenly in a large cookie sheet until quite thin. Sprinkle with sesame seeds and Bake at 300 for ten minutes, then remove and score with pizza wheel and bake 60-80 min longer. Cool completely and store on counter, fridge or freezer

Now for perfect plantain pancakes!

These are best fresh and hot but are also a decent substitute after freezing and toasting. They aren't sweet at all so you will have to add your own sweetner or use them like a biscuit and top with something savory!

Yup that is it!  

Cut and peel your plantains, and stick it all in your blender and purée until smooth. It should be easier to do than the crackers. 


It is also much more batter-like. Now you just use it like regular pancake mix. Only it is a bit thicker so I spread it out in the pan with the back of a spoon. 
Yum! Let it cook until bubbles form and are popping, then flip and cook a little longer till done!

Plantain paleo pancakes
-2 green plantains
- 4 eggs
- 1 tbsp vanilla
- 3-4 tbsp coconut oil
- 1 tsp baking powder
- 1 pinch salt

Peel and chop plantains. Blend all ingredients together. Scoop by 1/4 cup fulls onto pre-heated and greased pan/griddle. Cook until bubbles form. Flip and cook until done. Serve immediately or freeze and toast when ready to use. 

Thursday, January 30, 2014

First birthday cake and five bean salad

Two for one special this week! We celebrated Josiah's birthday on Saturday with family and I was honestly pretty worried about what to do for the smash cake. First of all, I am not going to just give him sugar. Second, he hasnt had eggs or wheat yet. Third, he is still intolerant to dairy and soy. His eating journey has been painfully slow and he is still on store bought purées (homemade is too thick and he gags) and small pieces of baby mum mums. When I came across this paleo mocha cake, I knew I could make it into a wonderful smash cake! The only new food in it for him would be coconut!  It is also a delicious cake that somewhat resembles a cheesecake in flavour. (But can I really judge that? I haven't had dairy in 10 months) to me anyway! It tasted like fudgy cheesecake!!

But first, the bean salad. Sooooo easy and delicious!!
Seriously that is it. Beans, a couple veggies, vinegar and oil, salt and pepper. 
Open up all your beans and toss them in a big bowl. 
Measure out your balsamic vinegar and olive oil, salt and pepper and combine well. 
Pour over beans and mix well. This is the point at which I often freeze 3/4 of the batch in serving size portions to use later, since it is such a huge recipe. 
Snack bags are actually just big enough to fit one cup in them. I toss these in a freezer bag and away you go!

Before you use the salad, chop up some red or green bell pepper, and some raw red onion. 
Stir it all up and you have a beautiful side dish to any meal! Or a main cored lunch! I often pull this out of the freezer for lunch, add my peppers and onions, the toast some sesame seeds and slivered almonds. I toss them into the salad along with a tsp of sesame oil and a sprinkle of salt! ASIAN  bean salad!! :) so good!!

Five bean salad:
- 1 can kidney beans
- 1 can chick peas
- 1 can black beans
- 1 can navy beans
- 1 can pinto beans 
- 1 can cut green beans (smaller can)
- 1 can corn kernels (opt)
- 1-2 bell peppers
- 1/2 lg red onion
- 3 tbsp balsamic vinegar
- 1/4 cup olive oil
- 1/2 tsp. fresh ground salt
- 1/2 tsp fresh ground pepper

Combine all ingredients and chill to serve.

On to the paleo chocolate fudge cake!!

 Start with your apple sauce, coconut milk and dates. Process them in your blender. I had a magic bullet available to me (alas my vitamix was not present) and it worked just fine! 
The original recipe Iooked at called for coffee! For a one year old cake? I don't think so! So I subbed in coconut milk!
Once blended, scrape it all into a bowl and add your mashed banana. 
Melt your coconut oil and add in your vanilla. Stir this into the wet mix 
Next combine your dry ingredients. Coconut flour, cacao powder, salt, baking  soda and cinnamon.  Cacao is different than cocoa. Cacao is raw, has way less allergins and significantly less caffeine. (Almost none really). 

When you mix the dry into the wet it will look something like this. the texture is like a very thick hummus almost. 

Next is the serious methodology part. Cut out of parchment paper, a circle exactly the size of the bottom of your pan. This is very important. YOU WILL NOT be able to remove your cake if you skip this step!!
Press the mix into the pan, and bake. 
Honestly, this cake will not pass a toothpick test, even when it's done. Just wait till it looks dry and it pulls away from the edges of the pan like this. 
Next comes the icing!! Not bad eh? Call it pudding, call it icing... Whatever! It does the job very well!
Cut your avocado and spoon it out into a small tall bowl. 
Add your maple syrup, vanilla and cacao. Stir it up a little so that you don't kick up cacao dust once you start blending. 
I used an immersion blender, but normal. Egg beaters would work too. And voala! Lovely frosting you can literally eat the whole bowl without an ounce of guilt!
Now came the tricky part. Even WITH parchment this cake wasn't gonna come out of the pan! It is seriously like cheesecake. Like... Use a spring-form pan!! So luckily I was making a little smash cake. So I traced out a little circle and cut pieces out of the perimeter until I had proper access to my cake. 

I inverted this small cake onto a plate, saving the little pieces left over to ice and serve like fudge. 
Decorating tip: a damp paper towel covers over a multitude of icing errors. 
Decorating tip #2: never underestimate the magic of super basic repetitive piping. Anyone can pick up this little design. It's like squeezing a ketchup bottle a hundred times over. That's it!
And there you have it! All that work... (I am shedding a tear). Anyway, I will be making this again!! I loved it so much! But it will be staying in my itinerary for one year old birthdays because it is so rediculously safe, no matter how strict your baby eating policies are!

Fudgy Paleo Birthday "Cheese"cake
- 10-12 pitted dates
- 1 cup apple sauce (or other fruity babyfood purée if you don't have applesauce)
- 1 1/2 bananas mashed
- 1/2 cup coconut oil melted
- 1 tbsp vanilla
- 1/2 cup coconut flour
- 1/4 cup cacao powder
- 2 tsp baking powder 
- 1/2 tsp salt
- 1/2 cup coconut milk (from can)
- 1 tsp cinnamon 

Purée dates, coconut milk, and apple sauce. Mash banana and stir into apple mixture. Add coconut oil and vanilla. Combine dry ingredients and add to wet. Press into 9 inch a parchment-lines spring form pan. Bake at 350 degrees for 50-60 minutes. Cool cake, and then chill completely prior to removing from pan. 

Avocado Icing:
- 1 well ripened avocado
- 1/4 cup cacao powder
- 1/4 cup maple syrup
- 2 tsp vanilla extract 
Blend all ingredients together with immersion blender or hand-held mixer. 

Ice cake as desired or chill and eat like pudding!