Well, this little bub inside me is starting to make himself known! (yes, HIMself... boy 3! We'll have three stooges in the new year! haha!). We had our ultrasound a few weeks go. Actually we had a fetal assessment. I tend to get high blood pressure in my pregnancies, and this is 100% not preventable or treatable. The treatment is to remove the baby! Blood pressure in pregnancy is related to how the placenta develops. If it develops with notching in the umbilical cord, this makes blood flow difficult, therefore raising my blood pressure in order to force the flow better. The best analogy to describe it, is if you try to drink a smoothie through a kinked straw. You have to suck that much harder. It's the same principle with my body.
Our fetal assessment showed that there is notching on one side of the umbilical cord, so I will inevitably face some blood pressure issues. It's simply a matter of watching for the signs. Some signs are, swelling, extreme weight gain, seeing stars or spots, headaches, dizziness etc...
up till now things have been okay. But lately my weight gain has been coming in higher increments. More like 3-5 lbs a week as opposed to the suggested 1 lb. This combined with my 140/90 blood pressure reading this morning was enough to tip me over the edge and declare it NECESSARY to start back on a keto diet. if nothing else, it ought to help with not retaining water. You need carbs in order to retain water. The less over-all weight my body carries, the less hard my heart must work in general, regardless of the placenta itself.
So today I marked day 1 of Keto during pregnancy. For breakfast I had 2 eggs with spinach, broccoli and some butter. lunch I had a hamburger patty in lettuce wrap, some dried seaweed, and a decaf latte made with partly cream. For a snack I had some shelled sunflower seeds. For supper I had Jalapeno poppers (which, is bacon, wrapped around jalapenos filled with cream cheese).
Now, granted this doesn't appear to be the healthiest of days, but the carb count for the day is incredibly low. This will enable me to pop into ketosis fairly quickly. I should also caution that dietary ketosis is an entirely different thing to ketoacidosis, which happens during starvation. One is incredibly hard on your organs and makes the body very acidic.The other; Dietary ketosis, is benign towards the body other than giving the pancreas a break from producing insulin! This break allows your bodies cells a chance to heal from inflamation. Where people tread the line between ketosis and keto acidosis, is when they do TOO MUCH intermittent fasting. This is obviousely a form of starvation, which can quickly lead to Keto-acidosis as opposed to ketosis. Also, it can lead to adrenal fatigue by exhausting your adrenal glands.
Keto for the average person involves consuming no more than 15-30 grams of carbohydrates in a day. In pregnancy Ketosis can be maintained at the higher level of 30-50 grams of carbs. this is "net" carbs, meaning that if a food has fiber, you can subtract grams of fiber from the total grams of carbohydrates. For example. The sunflower seeds I had for snack, have 10 grams of carbs for 1/3 cup. But 1/3 cup also has 5 grams of fiber. So when you subtract the fiber from the carbs, it's really only 5 grams of carbohydrates your body is consuming.
all this is to say, that with a healthy amount of veggies, a focus on good quality fats like coconut oil, and fish oils from consuming fish, it is 100% possible to eat a very VERY healthy diet on a keto diet. Now... it's also very possible to eat an UNHEALTHY diet. So that is why concious effort is so important!
Anyways, that's my schpeal for today. Hopefully I can stick to my guns. The plan is to eat keto at home and only break ketosis for bigger social occasions such as thanksgiving and larger christmas gatherings. The beauty of being pregnant is that ketosis can be achieved overnight, simply because of the balance of the hormones. And I intend to take FULL advantage of this fact, and also ensure I consume grains from time to time through this little feature I posess.
Until next time, thanks for reading!
Thursday, October 4, 2018
Tuesday, August 21, 2018
Eating for Pregnancy
Well, the news is mostly shared now, so I'll toss it on here! We're just about 17 weeks pregnant presently with baby #3.I realize it's been a very long while since I've posted on this blog! Allow me to enlighten you about what i've been up to the last year and a half or so.
shortly after we moved to Springfield, I continued to struggle with weight loss. I had done the "maximized living advanced plan" detox several times. This plan is a sugar detox where you dont eat anything that shows up on the glycemic index for about 30 days or so. It's supposed to reset the immune system and digestive tract. Unfortunately for my own digestive system, it uncovered some issues that can best be described under the category of "leaky gut syndrome". Leaky gut classifies a serious of bizarre and seemingly random digestive issues such as skin conditions, arthritis, allergies and the like, that all stem back to having an inflamed intestinal tract from eating the wrong things for your body type, or medications or illness etc... For me personally, my body began reacting specifically to gluten, in ways so severe I actually got tested for Celiac (which was negative thankfully). The best treatment for leaky gut (by my research anyways) is to eliminate common foods that cause inflammation for a long enough period of time (4-6 months) to heal. Then you can re-introduce foods slowly to figure out what's really damaging your body and what you're okay with. So I ended up doing this. I basically ended up eating Keto (a diet where you get 70% of your calories from fat, 15% from protien and 15% from carbohydrates). This diet releases ketones into your body and drastically reduces inflammation. On top of this, I also did not eat any caffeine, or dairy for the first 2 months of the 4 month cleanse. It took about 6-8 months and suddenly my tolerance for gluten slowly began to increase until eventually I could fully integrate it again. After that I did keto on and off for another 8 months or so. about a year and a half all together from start to finish.
I stopped eating Keto at about 6 weeks pregnant, because my body was very obviously refusing that diet during pregnancy. I love the way I feel when my body is in Ketosis, and I would have loved to stay that way. I did a bunch of research which told me it is possible to have a Keto pregnancy, though you should increase your carbs slightly in any case, and you will still be able to remain in ketosis. however, my body began to show signs that this would not be possible. And knowing that a person's blood volume increases by half over the first 20 weeks, I made the decision to simply stop eating keto.
The decision was easy but the process was not so simple. There is a very reliable diet that is suitable for all pregnancies called "the Brewer's Diet" based out of research done by a man whose last name is Brewer. The diet involves eating foods from all the food groups, with a heavy emphasis on getting enough leafy greens, and proper meat-based proteins, along with 2 eggs a day for their unique "choline" vitamins. In the end, its a very large amount of food, and they are quick to say on the outset that the weight gain is more like 40-50 lbs as opposed to the recommended 20-30 lbs. However, the diet covers any dietary restriction that could cause birth or pregnancy issues such as blood pressure, diabetes, or defects from lack of folic acid. It's well researched and proven, and a well balanced diet.
However, for me, coming off a keto diet, it began to be an issue. I was gaining easily a pound a day on the brewers diet, and couldn't remain on it.I switched over to eating a keto breakfast and lunch, and then a regular supper. Until eventually, the weight gain slowed down enough to allow me to phase into a regular diet.
Now that I am about 3 weeks away from that 20 week mark, I am beginning to re-assess how I will eat for the remainder of my pregnancy. At first I thought of trying keto again, however I'm hesitant about it simply because of how my body reacted initially. So next I thought perhaps Paleo would be a better fit (The cave man diet). However I still don't like the idea of eliminating grains all together, and also dairy. Also, given that it's garden season, the idea of not eating our home grown potatoes, beets and carrots, seems silly! So then I carefully orchestrated a list of what I could and could not eat... But even that... was not quite settling with me...
This afternoon I had a friend over and the idea hit me as simply as a breeze when you're outside. Breakfasts will be grain-less... either an egg dish, or a smoothie of some kind. Lunches need to either be salads or primarily a veggie dish with a simple protein. Snacks will need to not be junk food. Either something from a proper food group, or a highly nutritious snack food like a candy-free trail mix. Suppers, will be simply suppers. Whatever I make them.No snacks after supper on a regular basis. perhaps once or twice a week for social situations or a special movie night or something, but otherwise, not to be made a habit.
As simple as this sounds, its a bit ground-breaking for me... I work best with extreme boundaries like Keto, Paleo, Advanced plan, whole 30, etc.. So having a specific structure in place is key for me to have success. Having real limits not just "choose something healthy" is essential for my success. Otherwise I can justify everything under the sun! So this was an ideal choice.
In addition to the diet changes, I intend on trying to get in at least some moderate amount of exercise daily. I stopped exercising some time in my early second trimester, simply from fatigue. So my expectations are pretty low. A proper walk, some squats and arm curls, etc... just something to keep active.
anyways, thats a pretty significant update for now! Hopefully I'll remember to update this blog as I go along! :)
The end!
Wednesday, May 31, 2017
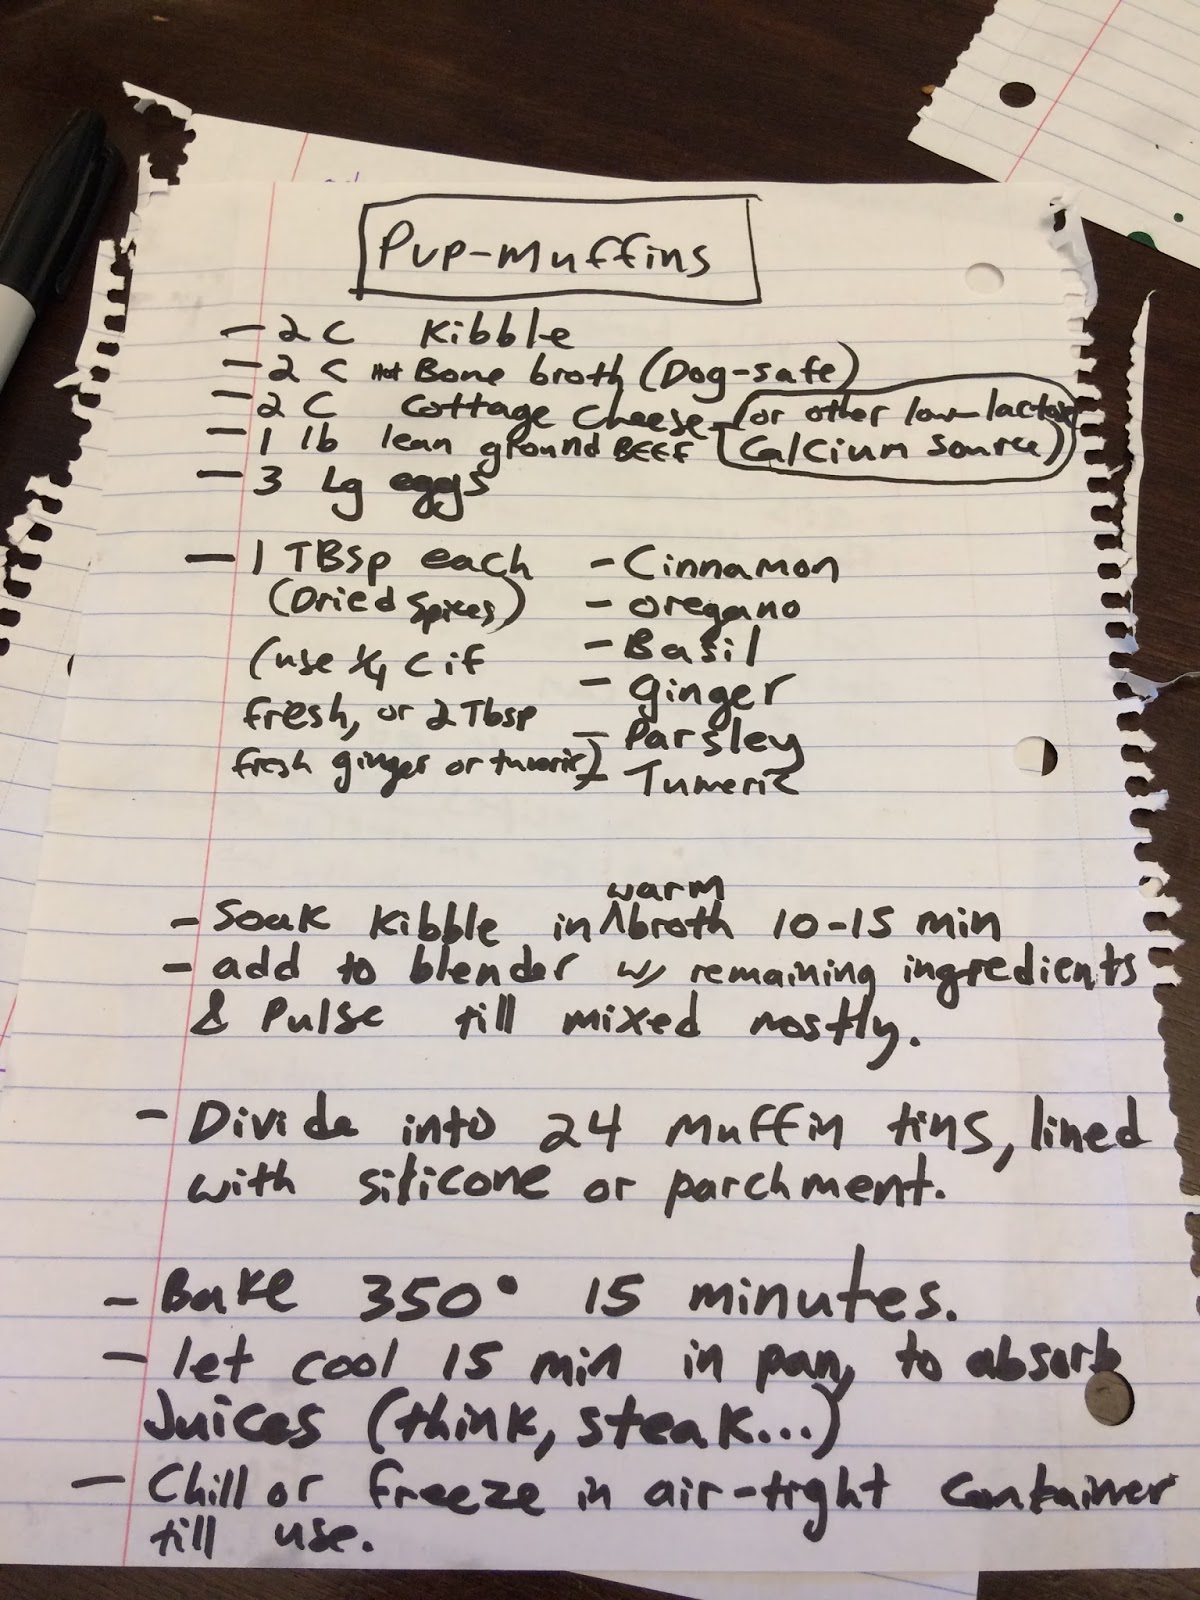
Puppy muffins
Well here I sit, supervising my kids in the kiddie pool at the end of May. I did not expect to fall into "get nothing done" mode quite so soon, but here I am with a mountain of clean laundry just sitting there, and we're hanging out outside!

We did run a lot of errands today actually, plus I made these very effective puppy muffins!! And yes... I do mean muffins for dogs... they would be disgusting if you or I ate them. In fact just a warning, you'll need a decently strong stomach to actually get these made as hydrated dog food is surprisingly potent in odour.

Ground beef was on sale so I bought like 5 lbs of it... I was going to use it all on dog treats, but I chickened out when I realized how cheap that was for actual hamburgers. So kaiser (or German shepherd puppy) was shafted of 4/5'ths of the beef that was supposed to be his! I feel like he was okay with it in the end though. He actually somehow managed to roll over from a sitting position without getting hurt he wanted it so badly! Like... rolling over mid-air some how...I was pretty impressed.

I'll start off by saying that I am both a dog-food-purist, and a creative cook... so our dog doesn't get table scraps but he still gets totally spoiled! He's also heavily into his training, being such a smarty pants, so it's a stage of life where we go through a lot or treats. Unfortunately most treats for dogs, are just as much junk food as human junk food. Nothing but empty calories and often harmful ones. And good quality wholesome treats are flipping expensive. So as hoity toytie as this all sounds, it's actually cause I'm cheap and creative. ;)
I started by not wanting to make something with grains. It seems like all the home-made dog treat recipes out there are either made with whole wheat flour, or sweet potato... both starches... Dogs are carnivores and grains aren't good for them. unfortuntately most dog kibbles are also full of fillers. Our dogs kibble however, is like gold (both in price and in nutritional value) so why would I back-track by adding fillers to his treats when I could use the kibble!?
I made a dog safe bone-broth which I used to re-hydrate the kibble (you could just use water too).

From there, I stirred in the 1 lb ground beef, 3 raw eggs and 2 cups of cottage cheese that was WELL past it's expiration date.

A little Google into the beneficial spices and herbs for dogs, and presto! You've got a muffin!

This recipe makes 24 muffins. I liked both the silicone liners and the parchment ones. Paper would likely just bleed all the meat juices, but feel free to try! Also, similar to a steak or meat loaf, you need to let these muffins sit for a while after baking to reabsorb the fluids.


Also, blender or food processor can be used interchangeably.

If you don't have either, make your mix the night before so that the kibble has more time to hydrate. The blender is simply because I was impatient and wanted to get things done quicker, by breaking up the softened kibble.

Best of luck! Please share your own experimental changes and how they went over! :)


We did run a lot of errands today actually, plus I made these very effective puppy muffins!! And yes... I do mean muffins for dogs... they would be disgusting if you or I ate them. In fact just a warning, you'll need a decently strong stomach to actually get these made as hydrated dog food is surprisingly potent in odour.

Ground beef was on sale so I bought like 5 lbs of it... I was going to use it all on dog treats, but I chickened out when I realized how cheap that was for actual hamburgers. So kaiser (or German shepherd puppy) was shafted of 4/5'ths of the beef that was supposed to be his! I feel like he was okay with it in the end though. He actually somehow managed to roll over from a sitting position without getting hurt he wanted it so badly! Like... rolling over mid-air some how...I was pretty impressed.

I'll start off by saying that I am both a dog-food-purist, and a creative cook... so our dog doesn't get table scraps but he still gets totally spoiled! He's also heavily into his training, being such a smarty pants, so it's a stage of life where we go through a lot or treats. Unfortunately most treats for dogs, are just as much junk food as human junk food. Nothing but empty calories and often harmful ones. And good quality wholesome treats are flipping expensive. So as hoity toytie as this all sounds, it's actually cause I'm cheap and creative. ;)
I started by not wanting to make something with grains. It seems like all the home-made dog treat recipes out there are either made with whole wheat flour, or sweet potato... both starches... Dogs are carnivores and grains aren't good for them. unfortuntately most dog kibbles are also full of fillers. Our dogs kibble however, is like gold (both in price and in nutritional value) so why would I back-track by adding fillers to his treats when I could use the kibble!?
I made a dog safe bone-broth which I used to re-hydrate the kibble (you could just use water too).

From there, I stirred in the 1 lb ground beef, 3 raw eggs and 2 cups of cottage cheese that was WELL past it's expiration date.


This recipe makes 24 muffins. I liked both the silicone liners and the parchment ones. Paper would likely just bleed all the meat juices, but feel free to try! Also, similar to a steak or meat loaf, you need to let these muffins sit for a while after baking to reabsorb the fluids.


Also, blender or food processor can be used interchangeably.

If you don't have either, make your mix the night before so that the kibble has more time to hydrate. The blender is simply because I was impatient and wanted to get things done quicker, by breaking up the softened kibble.

Best of luck! Please share your own experimental changes and how they went over! :)

Friday, January 2, 2015
Resolution cookies
Well it's after Christmas and after New Years and people have resolved to get healthy! NO JUNKFOOD! EXERCIZE DAILY! STOP WASTING TIME!! all noble causes for sure!
 For this one, I used quite a few things! The must haves, are 2 eggs, quick and rolled oats, almond meal (or almond flour. Same thing.), vanilla (I use home made), coconut oil, some kind of fiber (be it flax, bran, or any combination of other health thingeys) and some kind of liquid natural sugar. I also added unsweetened shredded coconut and slivered almonds, but you can use any kind of seeds or nuts in them!


 That's all your lovely omega 3's from coconut oil!!
I view resolutions a little differently and somewhat backwards. You can seem my "estranged normality" blog to see my specific resolutions this year, but basically, I believe resolutions should be habits that are fully formed by next New Years! That means, if I slip up, the game isn't over! Keep aiming for perfection!! Once I have been practicing a habit for a year, it'll stay for life right? RIGHT! I hope some others can take that to heart!
One of my resolutions was to give up all junk food (an all-encompassing term, no exceptions). Remember, that means if I accidentally have some, the gig isn't up! It's only starting!!
These cookies are a very nutritious but still calorie and carb dense way to wean off Christmas. I am pregnant, which makes coming off the sugar high of Christmas a bit more challenging in terms of how emphasized my sugar highs and lows are.
These cookies still have sugar (in the form of molasses and maple syrup) but they also have a tonne of fiber, omega 3's, and protein! This helps your body to digest the sugar slower. It is a great way to wean off of Christmas, because it gets your body used to craving proteins and healthy fats and healthy carbs, as opposed to simple stuff.
The best part? Tastes like an oatmeal cookie!!
Step 1) I reccomend you buy yourself a pantry like mine. Tupperware plus bulk barn equals beautiful healthy creations with ease!! 
Prettymuch every time I am making a creation, I just skim my cupboard and go from there!
2) pull out what you need
3) follow the recipe below! It's as easy as any other drop cookie. Throw it all together, drop onto tray, flatten if desired and bake.
These were actually very sweet! Next time I will use less sugar for sure, but since they were weaning cookies, I felt it was okay. ;) you could comfortably cut the sugar in half I would say if you prefer things on the less sweet side.
My toddler devoured these! Though be careful, they are quite crumbly due to the gluten free nature of them (so I fed him). Wait till fully cooled so the coconut oil has a chance to solidify and hold everything together better (I ate 3 straight out of the oven though. Hehe! With gentle hands, this is very doable).
Resolution cookies:
1 cup coconut oil
2 eggs
1 cup liquid natural sugar (I used 3/4 cup maple syrup, 1/4 cup molasses)
2 tbsp vanilla (yup! Tbsp! I use real stuff!)
1 cup almond meal
1/2 cup quick oats (measuring cups were slightly mounded on top)
3/4 cup lg flake rolled oats (mounded slightly)
1/2 cup unsweetened coconut shreds
1/2 cup slivered almonds
7-8 tbsp misc. Fibers, brans, husks, etc... (I used 1 maca root powder, 2 ground chia, 2 sphyllium husk, 1.5 spelt bran, 1.5 oat bran)
Combine first 4 ingredients well. Coconut oil should be a soft solid at room temperature, which makes creaming the liquids quite easy.
Add remaining ingredients and stir well. Heap by heaping tbsp onto cookie sheet. (I made about 3 dozen with this recipe). Flatten with a fork if desired.
Bake at 350 for 10-12 min (depending on your oven).
When they come out they may look like there is a puddle around them like this
Rest assured, this will soak in within minutes!Let them fully cool on the pans since they are a more crumbly cookie.
Store in freezer or on counter in air tight container...or just eat them all right away!
Friday, March 21, 2014
Basic meat stock
Most people know how to make soup stock, but often home made soup stock ends up tasting bland... Am I right? I found this perfect recipe for soup stock and made it more do-able and timely for myself! I hope you will enjoy my method!


 Next comes roasting! So spread your bones out evenly, leaving lots of space for veggies on the pans. I used three glass pans so everything will get evenly roasted and I can scrape off drippings without wrecking a pan.
 Choose your veggies. I always use plenty of onion and cellary and I am a little less generous with carrots since they tend to over-power with a sweeter flavour in the broth. Soup stock is excellent with A roasted tomato or two. It really helps to deepen the color and does not at all turn it into a tomato broth. For this batch I didn't have any handy. Garlic is more of a spice, but since it gets roasted I included it here.
 Now roast your veggies at 425 degrees for 45 minutes, rotating and stirring everything every 15 minutes.

This is called letting the stock rest. You just let things soak for 15 minutes or so. You can add a tbsp or two of vinegar to this to help draw juices out of bone marrow. I forgot to with this batch.  Now you are left with this... But actually this is good!! Cover the crusty areas if your pans with water, and pop them back into the oven for 15 minutes to soak. Leave the heat on for this.

 See how dark the stock is already? It hadn't even been on the stove top yet!
 I love my giant Costco stock pot... :)

Make your soup...I use some meat reserved from earlier, and a bunch of carrots, cellary and onions. Simmer it all for 20-30 minutes, boil up some noodles, rice or barley, and add that to your finished soup! Tada!!
Three major differences in my method:
1) roasting bones and veggies before you start
2) mixed bone broth
3) salt
First you need to pick your bones. I have done this with left over turkey carcasses or chicken too. But the best stock has a mixture of foul and cattle bones. It gives your stock a nice rounded flavour. So go to your supermarket and find some bones!
I bought whatever is cheapest. Two turkey thighs, 5 chicken legs and a pkg of frozen beef soup bones (thawed).
First thing is first! If you are thrifty like me, cut the meat off your birds and cook it up for later use.
Clearly I am not a professional butcher. Even if you will be using this meat for your soup later on it doesn't need to come off looking pretty. But reserving your meat and cooking it separately from your stock will allow the meat to retain some of it's flavour so it stands out in your finished soup. I was not very clean with my cutting so there is still plenty of meat attached to the bones for flavouring the stock.
Keep all the fat and skin too because it adds flavour. You can cool and remove 100% of the fat at the very end.
Choose your veggies. I always use plenty of onion and cellary and I am a little less generous with carrots since they tend to over-power with a sweeter flavour in the broth. Soup stock is excellent with A roasted tomato or two. It really helps to deepen the color and does not at all turn it into a tomato broth. For this batch I didn't have any handy. Garlic is more of a spice, but since it gets roasted I included it here. Cut all veggies into large pieces and separate into your casseroles. 
Another thing that adds flavour is the onion and garlic skins as well as the cellary leaves. These would burn during roasting so just stick them right into your stock pot. Once you add it all to your stock pot, cover the bones and veggies with water. Do not completely fill your stock pot yet, because you will add water in a little bit.
Pull them out, scrape them and put it all into your stock pot!! There is excellent flavour in those pan crusties!
Now top up your stock pot to its max capacity and bring it to a boil. Simmer for 8-12 hours (all day)
I love my giant Costco stock pot... :)When you are ready for making super, use a strainer to label out the amount of broth you need, then top up your stock pot and let it continue simmering into the evening. I only strain my stock right before bed.
To strain, use a big bowl or another stock pot, place the strainer over it and laidle stock into clean pots. Once strained, you can rinse out your big stock pot and put the clean broth in there for fridge storage.
If you have a pressure canner, you can can this stock. Otherwise I like to freeze it in 1 cup portions in zip-lock baggies.
Basic meat stock (this particular batches proportions. This is not a science, change the proportions however you desire)
- 2.5-3 kg mixed meat/bones (this was before removing meat from foul)
- 3 med onions
- 6 lg cellary stocks
-4 lg carrots
-6 lg garlic cloves
-6-8 bay leaves
- 1 tbsp peppercorns
- 1 tbsp sea salt
- 1 1/2 star anise
Remove any large amounts of meat and cook for later use. Cut veggies and garlic into large chunks and roast with bones at 425 degrees, for 45 min, stirring every 15 minutes. Put everything into stock pot. Soak pans and scrape drippings into stock pot as well. Add enough water to make 14 quarts. Bring to a boil and simmer all day. Strain and can or freeze stock.
Wednesday, March 5, 2014
Blessing Bags
This post is a little different. Its not a recipe. It's kinda food related but mostly about spiritually feeding ourselves and "the least of these" I think this is important to my topic of "eating to live tomorrow". It's all about big picture ideas. And the biggest picture of all, is eternity. And the truth is, if I can afford to eat this healthy (what a blessing) I can afford to bless someone less fortunate as well.

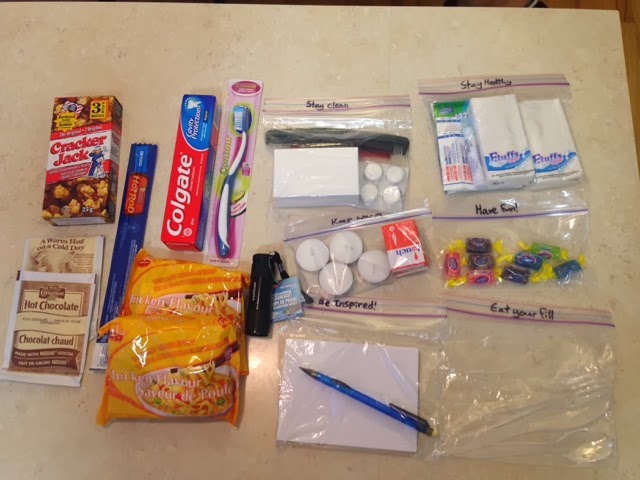
 Some Sani-wipes (24 pk), band aids (1 box divided 4 ways), lip chap (2/$1.25), and Kleenex(8/$1).
 1 pkg jolly ranchers divided. (I chose a hard candy because it has to withstand -40 and +40 degrees in a car)
 This one is controversial to a lot of folks. My theory: everyone and their dog has a lighter these days. If they want to be destructive with fire, it is hardly my fault. Sometimes at minus 40 they still don't land a bed in a shelter. I'd rather provide them some heat and light that they can maybe use in several ways. I chose matches over a lighter because i have no idea how lighter fluid holds up to freezing and boiling temperatures, and I just don't feel comfortable having it laying around in my car. Plus it could leak.
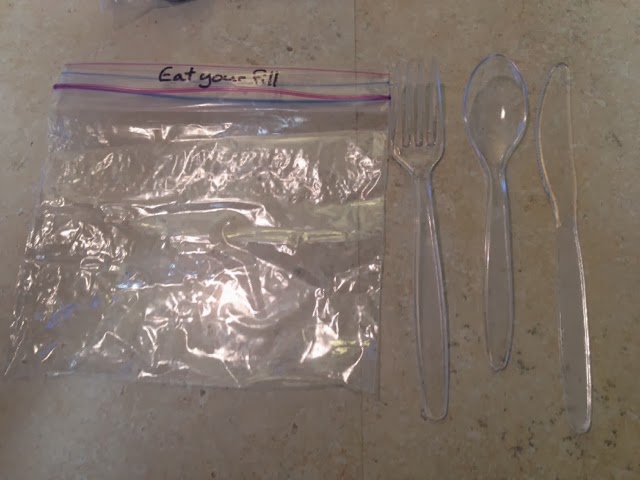 Cutlery is important! Don't sweat it with the knife. If someone wants to make a weapon they will make it out of anything. May as well give this person the dignity of proper utensils.
 I do cringe because I wouldn't feed this to my child... But if I was homeless and hadn't eaten all day, I wouldn't hesitate. Here is a very filling meal for a person. The noodles (2/$1) are light weight and easily made with hot water or eaten straight as they are. Hot rod (2/$1) does provide some protein believe it or not... Cracker jacks (3/$1) will have sugar which is actually okay for many diabetics on our streets, as well as fiber and carbs. And hot chocolate (10/$1) is always a nice treat for anyone.
 I decided a LED flash light ($2 ea) was essential since it gets dark so quickly here. You may have other essentials on your list. Lots of people like to include a calling card or Tim Hortons gift card. My budget doesn't allow for this, but I am happy with my bags.

Blessing bags are bags that you fill with life essentials to hand out to the homeless instead of giving them change. Personally I am always Leary of handing out cash, cause I don't want it to be drug money... And I also almost never have cash. Sometimes I take a homeless person out to eat, but that can also get expensive (and isn't exactly safe or timely). Blessing bags are the perfect solution. Keep one or two in each vehicle to have on hand!
I was really debating if I should share this. We have been reading through the New Testament as a church for 3.5 weeks now, and will complete it in 66 days total. I have really had my eyes opened as I study the character of Christ. And I am haunted by his beatitudes and woe's. It really doesn't read like any of us North American Christians will make it into the kingdom of heaven... If you just give the gospels an un-biased read... Anyway the part of this all that has stuck with me is looking for the "least of these" around me. This is just one way I can see myself doing this. Not the only way, but a small way. The reason I wasn't going to share this, is I don't want to do it for earthly praise. I want to store up treasure in heaven! But when I see Jesus teachings, another common occurrence is the notion that we ought to use our brains and logic not just legalize his teachings. The greater good in my opinion would be for you to read this post, and decide to make blessing bags of your own!! If it can encourage a parent to teach this to the next generation, all the better!
Some of you may be creative and you can simply take the idea and run with it. Others of you may be less creative and would like a bit of structure and "how-to".
I built my blessing bags entirely from one shop at dollarama. I made four blessing bags for a little over $50.00. That's roughly $12-13 a bag. Not bad for a mini survival kit! (And still cheaper than taking them out to eat)
Supplies you will need at home:
- 4 XL freezer bags. (Large rectangular, not square)
- scissors to cut off packaging
- permanent marker
- zipper sandwich bags and snack bags
Shopping in multiples:
If you have ever made a Christmas shoe box, think of this like that... If you make one, it's not cheap. If you make two or more it actually gets cheaper per shoe box because you can often buy things in multiples! I started with my dollarama XL zipper bags, a box of six, and quickly decided my cheapest number to work with would be four. Most items I needed came in packs of two or four. In order to make six bags, this would leave a lot of product wasted. So look around your dollar store and see. Do things come more in packs of two? Three? Four? Don't walk in with your pre-chosen number to make. Let the store decide.
Categorize:
Decide what needs you want to meet. Food, clothing, shelter, warmth, health, happiness, spiritual blessing etc...
I chose:
- heigine (cleanliness)
- health (minimal first aid)
- warmth
- food
- inspiration
- fun
Don't make an itemized list of what you will put in the bag, then you will be shopping at multiple stores to complete your list and spend more than you planned to. Buy what you see that fits your categories and forget the rest. This is a gift. You are not their sole provider.
For health:
For Heigine:
A bar of goats milk soap (2/$1), combs (pkg of 8 for a $1), magic towels (8/$1), tooth brush (2/$1), and toothpaste ($1).


I did not include shampoo or deodorant because it didn't fit into my budget for the sizes they had available. Plus I want it to be winter friendly. Surprisingly it takes a lot to freeze toothpaste. Frozen shampoo is somewhat useless to anyone.
Just for fun:
Warmth:
For food:
You need to use your noggin a bit here. Healthy doesn't always cut it, especially for food that can withstand plus and minus forty degrees!! Light weight, filling and convenient is the key. Can they open and eat it? (Cans are no good, unless you give them a can opener) Or make it with just adding hot water(mc Donald's or subway would give them this free of charge)?
Inspiration:

Everyone needs to write things down. And I chose a blank pad as opposed to a lined one incase they also like to be artistic. Paper (4/$1) and mechanical pencils (4/$1) are great and don't explode or freeze.
Essential:
How to pack your bags:
- open up un-necessary packaging, and divide your purchases into four equal heaps
- sub-divide each pile into categories.
-bag items that would need to be kept clean or contained, and label them as desired.
- put all items into your XL zipper bag.
-write a blessing on the bag label or in a card. Keep it simple. The person may or may not have a good reading level. My bags say: "BLESSING BAG! May God give you the strength and hope you need for the journey ahead".
And that is it! I hope you found this helpful and will pay-it-forward!
Saturday, February 8, 2014
Healthy baked oatmeal


Healthy baked oatmeal:
- 1 1/3 cup quick oats
- 1/4 cup sugar of choice (I used palm sugar, but honey or brown sugar would be okay too)
- 2 tsp baking powder
- 1 tsp cinnamon
- 1/4 tsp allspice
- 1 pinch salt
- 3 eggs (free run)
- 1 mashed banana
- 1 tbsp vanilla (I use homemade)
- 1 tsp maple extract (almond, rum or coconut extract would also taste good!)
- 1/2 an apple chopped very small
- 1/2 generous cup blueberries
- 1/2 cup non-dairy milk (I used coconut)
Mix your dry ingredients and add wet ingredients right to the bowl of dry. Lastly add your fruit. Stir it up and pour into an 8 or 9 Inch square pan.
Bake at 375 for 30 minutes or until the top is dry ish and springs back when lightly pressed.
I make this into four servings for a full serving of oats, fruit and only 2 ish tsp of sugar!! (Good with some maple syrup tho...:) I would also add some chopped nuts to the batter next time!

Subscribe to:
Posts (Atom)